Thursday, August 11, 2011
Sunday, June 19, 2011
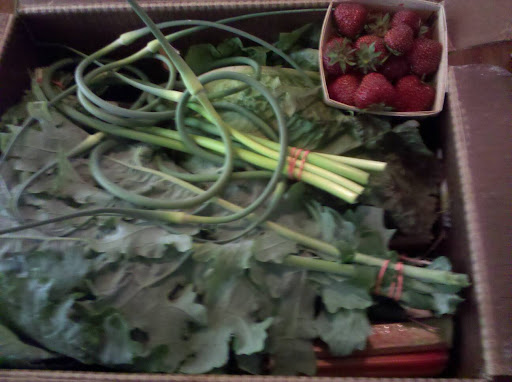
First CSA Share!
Published with Blogger-droid v1.6.1
Saturday, June 4, 2011
It's National Donut Day!
So you should go enjoy some donuts. If you have a favorite donut shop, share it with the world on my other blog donutdatabase.blogspot.com
Wednesday, April 6, 2011
There's always room for donuts
I have some very important news... I have taken over the Donut Database blog. This website lets you find donut shops, wherever you are, and add your favorite donut shops to a big map of all the donut shops in the world! Or at least that is the ultimate goal. I will also be featuring various amazing donut shops, and inviting all my adoring readers to send in names and pictures of their favorite places to get donuts. I'm hoping that I can use my new status here to score free donuts. Check it out....
www.donutdatabase.blogspot.com
www.donutdatabase.blogspot.com
Friday, March 11, 2011
Terribly Happy....

....about the danish I just made. Also, that's the title of an awesome movie from Denmark. Oh, I'm so clever! Anyway, I've been wanting to make some kind of so-called "laminated dough" for a long long while, but it always seemed like such a time commitment. Apparently "laminated dough" refers to kinds of dough with layers and layers and layers of butter (or shortening or lard, probably) in them, as a result of folding the dough, then rolling it out, then folding the dough, then rolling it out, then folding the dough.... sigh. And did I mention that you are required to refrigerate said dough for at least an hour between each folding/rolling session?
Well, because we are having the longest winter EVER and I am now suffering from extreme cabin fever, I have a lot of pent up energy. Last weekend, I somehow managed to channel this into baking, rather than just surfing the internet, watching horror movies, or drawing sharpie tattoos on myself and my children...
I started the dough on Friday night...and by Sunday "morning" (2 p.m.) there were fully formed danish ready to consume. Just to give you an idea of the time line.
That being said, there was nothing at all that was hard about making these. I consulted both Martha Stewart and Nigella recipes, as well as googling "danish pastry" and ended up with this:
1 cup milk (* have some extra on hand..more on this later)
2 envelopes instant yeast (or "rapid"....if you use active dry, dissolve it in the milk first)
4 1/2 cups flour
1/3 cup sugar
1 Tbs salt
1 pound of butter (softened...cut it up into tablespoons and lay on a plate, and it will soften in about 15 minutes)
2 large eggs and 1 egg yolk
Preserves
Sugar (to sprinkle on the tops)
Another egg, beaten (to brush on the tops, do not mix into the dough)
1. Put the flour, yeast, sugar , salt, 4 Tbs of the butter, and milk into the mixer and mix until the dough becomes cohesive. This is where the potential need for extra milk comes in. I don't know what it is about baking...is it related to the moisture in the air? The brand of flour? Who knows... but sometimes I end up having to add a lot more liquid just to make the dough stick together. Anyway, add the extra milk a tiny bit at a time so that you do not drown the dough.
2.When it comes together and does not have any big dry clumps of flour, knead it with the dough hook, or by hand, very briefly, until relatively smooth. Wrap in plastic and refrigerate several hours, or overnight.
3. Now, take it out of the fridge and I suggest letting it sit for just a few minutes because it will be really hard to roll out at first. Then, roll it out into a big rectangle, about 1 1/2 feet (yes really) by a foot. Approximate. It should be about a quarter of an inch thick. Now, distribute the butter all over two thirds of the dough, like this:

4. Now, fold the naked 1/3 over the butter, and then flip that folded part over the rest of the buttered part. Basically, fold it into thirds, like a business letter, as they say.

Voila. It will be bulging with butter in an almost obscene way. Try to sort of pinch the edges to keep the butter from seeping out the seams.
5. Roll it out, to the same dimensions as before. Now fold it into thirds again. And put into the refrigerator, wrapped in plastic. This is the first "turn", and there will be three turns. Now, you can start to imagine how danish and crossaints get all the layers, right?
6. After an hour (at least) take it out, roll out, fold up. Re-wrap, put back in fridge. For another hour.
7. See # 6. This is the third and final turn. EXCEPT, after this one, leave it in the fridge for 3 or 4 hours or overnight. This is for letting the dough rest and the butter get really cold before you cut into it. Or, it's tradition, perhaps. I don't know, but it seemed to work.
8. Now you are ready to SHAPE and FILL! Roll it out a final time into a big rectangle, about 1/4 inch thick. Cut along the edges so they are nice and straight.
9. Now, cut into 12 equal sized squares. Make cuts from each corned in toward the middle, like this:

10. Fold in corners like such:


11. Put a spoonful of preserves in the middle. Put on a baking sheet which has parchment paper if you have it (which I never do), or aluminum foil, which is what I did. Because I'm too lazy to wash baking sheets, this way you just peel off the foil and throw it away. Just typing that made me feel guilty about the environment.
12. When all 12 pinwheels are made (they will have to go on two baking sheets, fyi), cover them with plastic or a damp cloth, and let rise for an hour. Preheat the oven to 375.
13. Brush beaten egg on the tops, sprinkle with sugar. Bake about 20 minutes, switching the sheets halfway (in other words, 10 minutes on the top rack, 10 min on the bottom rack, for each sheet of pastries)
14. Cool on baking rack

Saturday, February 26, 2011
You should make this....
Flan. Looks fancy. So easy to make. Don't even bother to use a recipe for flan that involves reducing down the milk or cream or whatever. This recipe makes flan to rival any other flan, I promise. And I'm not tooting my own horn, because I didn't make the recipe up, it comes from Nigella, with just tiny adjustments to temperature and time. And by the way, even though the name "flan" suggests Spanish or Mexican cuisine, flan=creme caramel as far as I'm concerned, so you could call it that and serve it with French food.
 1. Preheat oven to 350.
2. Put 3/4 cup of sugar into a (metal) pie pan or a cake pan, or a tarte tatin pan, roughly 9" wide.
3. This is the ONLY tricky part....put the pan over medium heat on the stove...you will probably have to use oven mitts here so that you can keep lifting the pan and swirling it around. You want the sugar to melt and turn the color of caramel. Now, let me tell you what I actually did when I made this, because I don't you to get discouraged at this point in the recipe. The sugar was taking a very long time to caramelize, and I was nervous to keep leaving it directly on the burner, because I could see the sugar caramelizing in the spiral pattern of the burner. So, after a while, I put the pan into the oven. Then I just kept checking it. Between the burner and the oven, after a while MOST of the sugar looked caramel-colored, BUT there was still some sugar that had not even melted... wtf? So I ended up stirring it with a teaspoon and it all melted and turned a nice, uniform color. I hope this doesn't put you off the recipe. You could probably do the whole thing in the oven. Also, be careful during this part, because sugar burns are bad news.
4. Ok! The most difficult part is over! Now, mix together well: one can of evaporated milk, and one can of condensed milk, 3 large eggs, and 2 tsp of vanilla. Pour this mixture into the pan, on top of the caramelized sugar.
5. Put the pan into a bigger pan, like a roasting pan, and pour 2 cups of really hot water into the pan. Make sure the water does not get into the smaller pan!
6. Put the whole thing in the oven, for about an hour. You will have to stick a knife into it and see if it comes out clean. It should not look so jiggly as to be liquid, however, you can't expect it to lose all of its jiggle.
7. Refrigerate it overnight or at least for several hours. When you are ready to eat it, flip it over onto a platter and pour the rest of the syrup out of the pan onto the flan.

Tuesday, February 22, 2011
Tamale Time

Oh, how I love alliteration!
These are kind of a pain in the a** to put together but don't let that stop you - it's not that hard.
First figure out what you want to fill them with --- I am not giving any recipes here. You could go a million ways. You could cook pork, chicken, beef etc., as you would for a filling for something else, like say, oh..enchiladas. Or you could cook black beans with onion, garlic, serrano pepper, oil, water, until tender then mash them up in a pan with more oil and add salt until they taste good, which is what I did this time. You could just cook some chorizo, which would probably be the fastest thing to do, now that I am thinking about it. They even make "soyrizo" for any vegetarians out there, but I cannot vouch for the taste....I've only seen it. You could do whatever you want.... the sky's the limit for you, pal!
Then, make the masa - this is the corn part of the tamales.

1. Get a bag of instant masa, they have it at almost every grocery store.
2. Mix 4 cups of instant masa with 2-3 cups water - enough to make it a pliable dough.
3. Put 8 oz of shortening* in the mixer and beat it. Or do it by hand. Then mix in the masa. Then add enough chicken broth or other liquid until it comes together to the consistency of playdoh. Mmm, yummy.
(*or lard, wink wink)
Now, assemble them
1. Soak dried corn husks in hot water for 20 minutes (weigh them down with a bowl or something)
2. Spread (or, smoosh down with your fingers) about one big tablespoon of tamale dough in the middle of the corn husk, in a square about 3x3in

3. Put a spoon full of filling in the middle of this. Looks pretty, right? Refried black beans are not photogenic.

4. Fold one side of the corn husk over, so that the filling is getting folded into the middle of the dough, then fold the other side over. Then, fold the bottom of the corn husk up, and tie around it with a string. This reads much more complicated than it really is.

Once they are all assembled, you can wrap them and freeze them, supposedly, or put them in the fridge for a day or so, or steam them right away. Find a pot that you can either put a rack in the bottom of, or use a big pasta pot with a colander insert, which works perfectly. Now put water in the bottom. Stand all the tamales up, with the folded part at the bottom, in the pot. Put a damp cloth over the top, then put the lid on. Turn the heat up to about medium-high and steam those suckers for an hour.
You can make sauce to go on them, and I recommend that you do, since I kind of think tamales can be a little bit dry. This is just a smooth tomato salsa

1. Put 2 cans of diced tomatoes, half a chopped onion, 2 serrano peppers, and 2-3 cloves of garlic in the blender and blend into oblivion.
2. Heat about 3 Tbs oil in a pan and pour in the tomato mixture, cook for about 15-20 minutes over medium low heat.
Perhaps I should add here that this makes an absolutely insane amount of tamales. This much dough would likely make about 40 tamales, but I stopped at 20, so I can't be sure. The salsa ranchera recipe yields a ton also, but now you will just have something to dip your chips in.
Now, for your fun fact of the day....one of these is just called a tamal, not a tamale. Just in case you were wondering. Also, there are certain wolves in the arctic....and sea otters are ticklish.
Subscribe to:
Posts (Atom)